Regular continuing care appointments are vital for patient health and practice success in any dental office. Ensuring these appointments are scheduled efficiently and accurately is key. A common challenge arises when the system doesn’t automatically reset continuing care due dates after a patient’s visit. Often, this is due to improper setup of procedure codes not being correctly linked to continuing care types. This article will guide you through the process of attaching continuing care types to procedure codes within Dentrix Enterprise, ensuring a smoother, more automated patient recall system.
To rectify issues with automatic continuing care resets, it’s essential to review your procedure code configurations. Verifying that the correct continuing care type is associated with each relevant procedure code is crucial for automating the due date reset process.
For instance, consider the PERIO continuing care type. By linking this to procedure codes like D4341 (Periodontal scaling and root planing – four or more teeth per quadrant) and D4342 (Periodontal scaling and root planing – one to three teeth per quadrant), patients undergoing these treatments are automatically enrolled in the appropriate continuing care schedule. This automation reduces manual errors and ensures consistent follow-up care.
Step-by-Step Guide to Link Continuing Care Types to Procedure Codes in Dentrix Enterprise
Follow these simple steps within Dentrix Enterprise to link continuing care types to your procedure codes:
-
Access Procedure Code Setup:
- Navigate to the Office Manager module in Dentrix Enterprise.
- From the Maintenance menu, hover over Practice Setup.
- Click on Procedure Code Setup to open the configuration window.
-
Select and Edit a Procedure Code:
- Choose a Procedure Code Category from the list to narrow down your search.
- Select the specific procedure code you wish to edit from the displayed list.
- Click the Edit button. This will open the Procedure Code Editor – Existing dialog box, allowing you to modify the settings for the selected code.
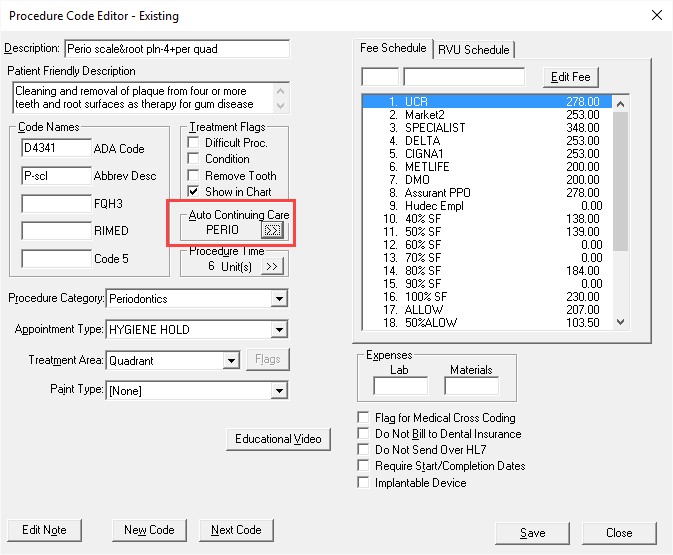 Procedure Code Editor in Dentrix Enterprise for Continuing Care Setup
-
Assign Auto Continuing Care Type:
- Within the Procedure Code Editor, locate and click the Auto Continuing Care search button. This button typically appears as a magnifying glass icon next to the “Auto Continuing Care Type” field.
-
Choose the Continuing Care Type:
- A list of available continuing care types will be displayed. Select the continuing care type that is most appropriate for the procedure code you are editing. For example, you might choose “PERIO” for periodontal procedures or “PROPHY” for routine prophylaxis.
- Click the Select button to confirm your choice and assign the selected continuing care type to the procedure code.
-
Save and Close:
- Click the Save button in the Procedure Code Editor to apply your changes.
- A confirmation message will appear. Click Yes to confirm saving the changes.
- Finally, click Close to exit the Procedure Code Editor and return to the Procedure Code Setup window. Repeat these steps for any other procedure codes that require continuing care type assignments.
Key Considerations for Continuing Care and Procedure Codes
- One-to-One Relationship: It’s important to note that each procedure code can only be linked to one continuing care type. However, you can assign the same continuing care type to multiple procedure codes. This flexibility allows you to group procedures under a single recall category.
- Automation Benefits: Attaching a continuing care type to a procedure code in Dentrix Enterprise unlocks significant automation, streamlining your patient recall process in several ways:
- Appointment Reason Automation: When scheduling an appointment and selecting a procedure code linked to continuing care as the appointment reason, Dentrix Enterprise automatically associates the assigned continuing care type to the appointment. This ensures accurate tracking from the outset.
- Automatic Due Date Reset: Upon posting a procedure code with an attached continuing care type as complete, Dentrix Enterprise intelligently resets the patient’s continuing care due date. The new due date is calculated based on the interval defined for that specific continuing care type, eliminating manual adjustments and potential errors.
- Automatic Continuing Care Assignment: If a patient doesn’t already have a continuing care type assigned to them, and a procedure with an attached continuing care type is posted, Dentrix Enterprise will automatically assign that continuing care type to the patient. The system uses predefined defaults for the continuing care type to initiate the recall schedule seamlessly.
By properly linking diagnosis codes and their related procedures to continuing care types, your practice can significantly enhance its patient recall system. This not only ensures consistent patient care but also optimizes scheduling efficiency and reduces administrative workload, contributing to a healthier practice and happier patients.