Diagnosing car air conditioner problems can seem daunting, but with the right approach, you can pinpoint issues and potentially save on costly repairs. This guide, created by the experts at xentrydiagnosis.store, will walk you through a systematic Air Conditioner Diagnosis Car process, helping you understand common AC problems and how to address them. Whether your AC is blowing warm air, making strange noises, or not working at all, we’ll provide you with the knowledge to troubleshoot effectively.
Common Car AC Problems and Initial Checks
Before diving into complex diagnostics, let’s address some common scenarios in air conditioner diagnosis car and simple checks you can perform.
AC is Cool, But Not Cold Enough
If your car’s AC system produces moderately cool air but fails to reach truly cold temperatures even on the max setting, several factors could be at play.
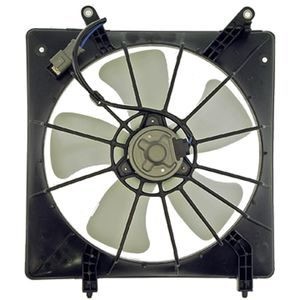
First, check your cooling fans. When your air conditioning is switched on, especially at maximum cool, both the condenser fan and radiator fan should be running. These fans are crucial for dissipating heat from the refrigerant.
Next, inspect for obstructions. The condenser, usually located in front of the radiator, needs clear airflow to function efficiently. Check for leaves, bugs, dirt, or any debris blocking airflow through the condenser. A blockage can significantly reduce the AC system’s cooling capacity, impacting your air conditioner diagnosis car efforts.
Another often overlooked component in air conditioner diagnosis car is the cabin air filter. A clogged cabin air filter restricts airflow into the cabin and across the evaporator core, hindering cooling performance. Locate your cabin air filter (usually behind the glove box or under the cowl) and inspect it. Replace it if it’s dirty or clogged.
If these basic checks don’t resolve the issue, the next step in air conditioner diagnosis car requires more specialized tools: manifold gauges. These gauges allow you to read the high-side and low-side pressures within your AC system. Refer to your vehicle’s repair manual or online resources for the recommended pressure readings. Accurate pressure readings are vital for further air conditioner diagnosis car.
Diagnosing with the AC Compressor
The AC compressor is the heart of your car’s air conditioning system. A systematic air conditioner diagnosis car often starts here.
With the engine running, turn your AC to max cool and the fan to high. Observe the AC compressor clutch. This is the center part of the compressor pulley that engages when the AC is turned on. It should engage smoothly, connecting the pulley to the compressor shaft.
If the clutch engages and disengages rapidly (every few seconds), this is a strong indicator of low refrigerant. You can confirm this by watching the low-side pressure gauge. It will drop sharply when the clutch engages, then rise again when it disengages due to insufficient refrigerant.
Adding refrigerant in a controlled manner can help confirm this diagnosis. As you add refrigerant, the compressor should run more consistently, and the gauge readings should stabilize within the recommended range.
If the clutch is not engaging at all, even with sufficient refrigerant (which you’d need to verify with gauges), electrical issues may be the culprit. Use a voltmeter to check for voltage at the compressor clutch connector when the AC is switched on.
- Voltage present, clutch not engaging: The clutch itself may be faulty and require replacement.
- No voltage: The issue lies upstream. Potential causes include a faulty cycling switch, a blown fuse in the AC circuit, or insufficient refrigerant pressure triggering the low-pressure cutoff switch. These components are designed to protect the AC system.
Leak Detection: A Key Aspect of Air Conditioner Diagnosis Car
Refrigerant leaks are among the most frequent reasons for AC problems and a critical focus in air conditioner diagnosis car. If your system pressure is consistently low, a leak is highly probable.
The most effective method for leak detection in air conditioner diagnosis car is using a UV leak detection kit. These kits contain a UV dye that you introduce into the AC system and a UV light to scan for leaks.
Follow the kit’s instructions carefully. After adding the dye and running the AC system for a while to circulate it, use the UV light to inspect various components:
- Fittings and connections: Check all points where AC lines connect, ensuring they are secure.
- Compressor hose manifolds: Examine where hoses attach to the compressor.
- Compressor front seal and pressure switch o-rings: These are common leak points on the compressor.
- Hose crimp points: Inspect where hoses are crimped onto metal fittings.
- Schrader valves: These valves, similar to tire valves, can leak.
- Condenser: Look for pinhole leaks, especially in the condenser fins.
- Evaporator drain: Shine the UV light at the evaporator drain tube under the car. Oil or dye in the condensate can indicate an evaporator core leak, although this often requires professional air conditioner diagnosis car.
Important Note: UV dye detection won’t be effective if the system is critically low on refrigerant and the compressor isn’t cycling. You may need to add a small amount of refrigerant to allow the system to run and circulate the dye for effective air conditioner diagnosis car.
In-Depth Component Analysis for Air Conditioner Diagnosis Car
For a more thorough air conditioner diagnosis car, understanding the function and common failures of each AC component is essential.
AC Compressor and Clutch
The AC compressor is a pump driven by the engine that circulates refrigerant throughout the system.
Common Issues:
- Internal leaks: Seals can fail, or the compressor housing itself can leak refrigerant.
- Internal wear and contamination: Worn internal parts can generate debris that circulates in the system, causing further damage. Low AC oil levels (often due to leaks) exacerbate wear.
- AC clutch failure: The electromagnetic clutch can fail to engage, preventing the compressor from operating.
- Electrical supply problems: Blown fuses, faulty pressure switches, issues with the dash control module, or broken wiring can prevent power from reaching the clutch.
Diagnosis Tips:
- Check for visible oily, greenish leaks around the compressor.
- Listen for unusual noises from the compressor when the AC is engaged.
- Before replacing the compressor, always verify power supply to the clutch and inspect for other potential electrical faults.
AC Accumulator/Drier
The accumulator or receiver/drier is a filter and reservoir in the AC system. It removes moisture and contaminants from the refrigerant.
Common Issues:
- Desiccant failure: The desiccant material inside can break down, releasing particles into the system and causing blockages.
- Saturation due to leaks: If leaks allow moisture to enter the system, the desiccant can become saturated and lose its effectiveness, leading to internal corrosion and potential compressor damage.
AC Orifice Tube/Expansion Valve
The orifice tube or expansion valve is a metering device that controls refrigerant flow into the evaporator, causing a pressure drop and temperature reduction.
Common Issues:
- Contamination: Debris in the system is the primary cause of blockage and malfunction.
- Incorrect pressure regulation: If pressures are abnormally high or low (after verifying correct refrigerant levels and fan operation), the expansion device may be faulty.
Diagnosis Tip: Always rule out other causes like refrigerant level and fan problems before suspecting the expansion device.
AC Condenser
The condenser, similar in appearance to a radiator, is responsible for cooling hot, high-pressure refrigerant gas and condensing it back into a liquid.
Common Issues:
- Refrigerant leaks: Condensers are vulnerable to damage from road debris and corrosion, leading to leaks.
- Blockages: Contaminants can restrict refrigerant flow, reducing cooling efficiency.
- Fan malfunction: A faulty radiator/condenser fan reduces airflow across the condenser, impairing heat rejection.
Diagnosis Tip: Inspect the condenser for physical damage and ensure the cooling fans are operating correctly.
AC Evaporator Core
The evaporator core is located inside the dashboard and is where refrigerant absorbs heat from the cabin air, producing cold air.
Common Issues:
- Leaks: Evaporator cores can corrode and leak refrigerant over time, especially in humid climates.
- Blockages: Although less common, debris can restrict airflow through the evaporator core.
Diagnosis Tip: Use an electronic leak detector near the evaporator drain tube to check for leaks. A green, oily residue in the drain can also indicate a significant evaporator leak.
Conclusion: Mastering Air Conditioner Diagnosis Car
Effective air conditioner diagnosis car involves a combination of systematic checks, understanding AC system components, and using the right tools. By following this guide, you can confidently approach AC troubleshooting and potentially resolve issues yourself. However, remember that AC systems involve pressurized refrigerant and complex components. If you are uncomfortable with any of these procedures or suspect a major issue, it’s always best to consult a qualified automotive technician for professional air conditioner diagnosis car and repair.