Is your car’s air conditioning system blowing warm air, or perhaps not working at all? Diagnosing car AC problems can seem daunting, but with a systematic approach, you can often pinpoint the issue yourself, saving time and money on unnecessary mechanic visits. This guide will walk you through common car air conditioning problems and how to perform an effective Air Conditioning Diagnosis Car, empowering you to understand your vehicle’s cooling system better.
1. AC is Cool, But Not Cold Enough? Start Here
If your car AC is producing air that’s moderately cool but not truly cold, especially when set to maximum cooling and high fan speed, several common issues could be at play. A proper air conditioning diagnosis car starts with these initial checks:
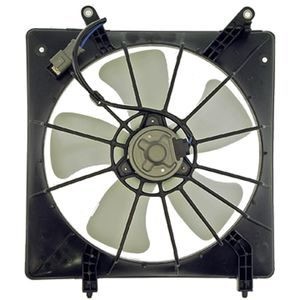
- Check the Cooling Fans: When your AC is switched on, listen and look to see if the cooling fans on the condenser (located in front of the radiator) are running. These fans are crucial for dissipating heat from the refrigerant. If they aren’t operating, your AC system’s efficiency will be significantly reduced.
- Inspect for Condenser Blockages: The condenser needs unobstructed airflow to function correctly. Examine the condenser fins (similar to a radiator’s) for any debris like leaves, bugs, dirt, or road grime. These obstructions can severely limit airflow and reduce cooling performance. Gently clean the condenser with a soft brush or compressed air if you find any blockages.
- Cabin Air Filter Check: A clogged cabin air filter restricts airflow into the passenger compartment, impacting AC performance. Locate your cabin air filter (usually behind the glove box or under the hood) and inspect it. If it’s dirty, replace it. A clean cabin air filter is essential for optimal AC efficiency and good air quality inside your car.
- Manifold Gauge Set for Pressure Readings: For a more in-depth air conditioning diagnosis car, using a manifold gauge set is the next crucial step. This tool allows you to read the high-side and low-side pressures of your AC system. These pressure readings are vital for determining if your system has the correct refrigerant charge and if the compressor is functioning as expected. Consult your vehicle’s repair manual or online resources for the specific recommended pressure ranges for your car model.
2. Diagnosing the AC Compressor: The Heart of the System
The AC compressor is the engine of your car’s air conditioning system. A methodical air conditioning diagnosis car often begins with assessing the compressor’s operation:
- Compressor Clutch Engagement: With the engine running and the AC turned to max cool and high fan setting, observe the AC compressor. Specifically, watch the clutch – the center part of the compressor pulley. It should engage (spin with the pulley) when the AC is on. If the clutch is rapidly engaging and disengaging every few seconds, this is a strong indicator of low refrigerant levels. You’ll likely also see the low-side pressure on your manifold gauge fluctuating drastically during these engagement cycles.
- Voltage Check at the Compressor: If the compressor clutch isn’t engaging at all, even with sufficient refrigerant (pressure readings should confirm this), use a voltmeter to check if voltage is reaching the compressor.
- Voltage Present: If voltage is present but the clutch isn’t engaging, the compressor clutch itself might be faulty and require replacement.
- No Voltage: If there’s no voltage reaching the compressor, the issue could be upstream in the electrical circuit. Potential culprits include a faulty cycling switch, a blown fuse in the AC circuit, or insufficient refrigerant pressure triggering the low-pressure cutoff switch. The low-pressure switch is a safety mechanism that prevents the compressor from running when refrigerant levels are critically low, protecting it from damage.
3. Leak Detection: The Most Frequent AC Problem
Refrigerant leaks are the most common cause of car AC problems. Low refrigerant pressure, identified during your air conditioning diagnosis car with manifold gauges, strongly suggests a leak somewhere in the system.
- UV Leak Detection Kit: The most effective method for pinpointing AC leaks is using a UV leak detection kit. These kits typically include UV dye and a UV flashlight. Follow the kit’s instructions to introduce the UV dye into your AC system. After running the AC for a short period, use the UV flashlight to inspect the system components in a darkened environment. The dye will glow brightly at the location of any refrigerant leaks.
- Visual Inspection of Fittings and Components: Even without UV dye initially, a thorough visual inspection is part of effective air conditioning diagnosis car. Carefully examine:
- Fittings: Check all AC line fittings and connections to ensure they are tight and secure.
- Compressor Hose Manifolds: Inspect where the hoses connect to the compressor for any signs of leaks (oily residue).
- Compressor Front Seal and Pressure Switches: Examine the compressor’s front seal and the O-rings around pressure switches mounted on the compressor for leaks.
- Hose Crimp Points: Check where AC hoses are crimped to fittings, as these are common leak locations over time.
- Schrader Valves: These valves (similar to tire valves) can sometimes leak.
- Condenser: Inspect the condenser for physical damage or pinhole leaks, especially in areas prone to road debris impact.
- Evaporator Drain: Locate the evaporator drain tube (usually exiting the firewall in the engine bay). Use the UV light to check for dye around the drain. Oil or dye in the drain can indicate an evaporator core leak, which is inside the dashboard and more complex to repair.
Important Note: UV leak detection is most effective when there is still some refrigerant pressure in the system to circulate the dye. If the system is completely empty, you may need to add a small amount of refrigerant with dye to perform the leak test.
4. Understanding Key AC Components for Deeper Diagnosis
For a complete air conditioning diagnosis car, understanding the function and common problems of each major component is essential:
- AC Compressor and Clutch: The compressor is the pump that circulates refrigerant.
- Common Issues: Leaks (seals or compressor body), internal wear/contamination, AC clutch failure (mechanical or electrical), or electrical power supply problems to the clutch.
- Diagnosis Cues: Low refrigerant, visible oily/green leaks, compressor clutch not engaging, unusual noises from the compressor. Always inspect electrical connections and fuses before replacing the compressor.
- AC Accumulator/Drier (or Receiver/Drier): This component removes moisture from the refrigerant.
- Common Issues: Internal desiccant material breakdown (leading to system contamination), leaks causing desiccant saturation.
- Diagnosis Cues: System contamination signs (may require professional diagnosis), leaks detected around the drier. The accumulator/drier is typically replaced whenever the system is opened for major repairs.
- AC Orifice Tube/Expansion Valve: Regulates refrigerant flow and pressure drop, causing cooling.
- Common Issues: Blockage due to contamination.
- Diagnosis Cues: High or low system pressures (manifold gauge readings), but rule out refrigerant level and cooling fan issues first. Expansion valve/orifice tube problems are often diagnosed by elimination after checking other components.
- AC Condenser: Cools hot, high-pressure refrigerant gas into a liquid.
- Common Issues: Leaks (often from road debris damage), blockage due to contamination, reduced airflow due to cooling fan problems.
- Diagnosis Cues: Leaks, overheating issues (if airflow is restricted), system inefficiency. Check cooling fans when diagnosing condenser issues.
- AC Evaporator Core: Absorbs heat from the cabin air, making it cold.
- Common Issues: Leaks (due to corrosion or age), often difficult to access as it’s inside the dashboard.
- Diagnosis Cues: Refrigerant leak detection at the evaporator drain, musty smell from vents (from moisture buildup if drain is blocked, though not directly AC failure), poor cooling. Electronic leak detectors are useful for confirming evaporator leaks.
Still Unsure? Seek Professional Air Conditioning Diagnosis Car
While this guide provides a comprehensive approach to air conditioning diagnosis car, some issues require specialized tools and expertise. If you’ve performed these checks and are still unable to pinpoint the problem, or if the repair seems beyond your DIY comfort level (e.g., refrigerant recovery and recharge), it’s best to consult a qualified automotive AC technician. They have the training and equipment to accurately diagnose and repair complex AC system problems, ensuring your car’s AC is blowing cold air again.
